
Automotive, Commercial and Marine Instrument and Control System Specialists since 1971

Call Us
03 9457 4755
03 9457 4755

Halda
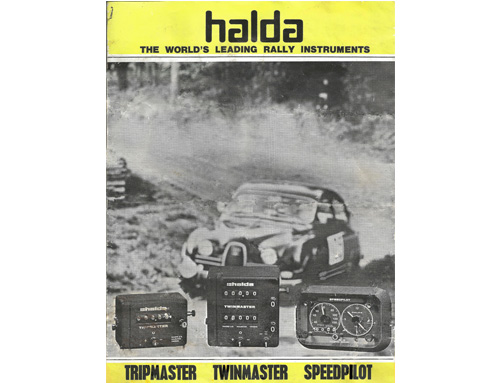
Halda Speedpilot Tripmaster and Twinmaster

Truck Gauges

We have a complete set of truck gauges available in Heritage Gold, Heritage White, Cobra and HIWHITE styling.


Porsche

We can refresh your Porsche gauges


Tacho Upgrades

Changed your 60-70's car to electronic ignition?
We can help make your tacho work again.

Due Credit should be given to Martin Jubb The Haldaman who was responsible for much of the text below.
Unfortunately he passed away in 2011.
Tripmaster

A tripmaster we restored recently including producing the decals ourselves.
This is an ODOMETER (or mileometer) which reads to 1/100th of a mile or kilometer and can be calibrated extremely accurately. This is done by changing a pair of gear wheels when initially setting the unit up. The read-out can be zeroed by the pull of a knob, advanced or reversed by hand and made to run forwards or backwards or turned off.
It is driven from the car's speedometer cable by means of a 'T-Gear' (a right-angle drive take off) which screws in between the speedo cable and speedometer and another similar cable. In a couple of minutes you can swap gears to allow for different axle ratios or tyres and change to miles or kilometers, provided you have set it up beforehand. There is a slight additional load on the cable; internal illumination is provided.
Twinmaster
This is in effect two tripmasters combined into one casing so you can use one meter for the day's or section's total milage and the other for each interval between road book instructions. There are two versions of both Twinmasters and Tripmasters, the earlier has a metal outer case and minor internal improvements.
Speedpilot
This is the unit with two round dials, an odometer and several knobs. There are several versions but they all do the same job, which is to tell you if you are keeping to a pre-set average speed.
One dial is set to your required average and the other is an 8-day clock with an extra hand (although some models lack an hour hand). The extra hand is positioned under the minute hand as you begin the journey or regularity section and will keep pace exactly with the minute hand if the pre-set speed is complied with. A useful instrument over a long section, but the navigator will always need to do his stuff to get the exact minute of arrival correct. You can do a Classic Marathon on just a Tripmaster but the other units give extra help. Speedpilot calibration is by turning an internal screw. You can fit a Master and a Pilot to the same car.
T-Gears
Speedpilots have two T-gears in their drive-live but masters only have one. There are 8:1 and 7.5:1 reduction gears but the 7.5:1 gears are only fitted to the back of Speedpilots and an 8:1 will do. The only other type of T-gear is a 1:1 which is 'not' a reduction gear, dear boy, and is used to join two instruments or change direction of drive in a restricted space.
The drive pin connecting the Speedpilot with the T-gear screwed to its back must be the correct length and turn 'CLOCKWISE' looking at the front of the unit. If it is turning the wrong way, the Speedpilot will move a bit and then make a buzzing noise. Take the T-gear behind the speedometer and swap over two opposite end fittings, by loosening the grub screws and pulling the fittings out. Turn the nylon gear or worm shaft round as well and don't lose the little thrust washers, one at each end. This will reverse the direction of rotation and will make the Speedpilot click away in fits and starts as it is supposed to. This is because it is driven by a system of pawls, ratchets and eccentrics (like historic rallying) and worries people who expect it to go round continuously like a Twinmaster.
There are two thicknesses of inner cable, the thicker 3.8mm cable is used in most British cars with Smiths speedometers. Cutting the squared end is only to be attempted by the intrepid or the panic-stricken as the wire is liable to uncoil as the end is removed. It will NEVER lie flat again! We have the equipment for making new inner cables. An inner cable should never make contact with the closed end of its socket when fitted into its T-gear or instrument. The greater the radius of any bends in your drive cables, the longer they will last. 6" radius is the very minimum but a longer cable is advisable even if it shows.
Calibration
Speedpilots
Speedpilots are adjusted by a screw accessible from underneath. The screwdriver goes in at an angle. Try to fit the unit so you can reach the screw without having to take the speedpilot out as this saves time when you are calibrating. The screw head turns a worm and wheel arrangement which has an enormous range of adjustment, but if the screw does resist, don't force it or it will jam everything up. The right-hand number on the odometer must indicate tenths of a mile or kilometer when you calibrate it. If you calibrate it to read units the pilot hand will move at 1/10th of the speed at which it should actually be going and your navigator will blow a fuse.
Tripmaster and Twinmaster
These are both calibrated by changing cogs inside the removable panel on the left side: there are three brass cogs of which you change the top (largest) and bottom (smallest) ones, leaving the intermediate 55-tooth cog attached all the time. The standard calibration cogs (141 and 32) should be fitted and used over a measured mile or kilometer to find the correct cogs for your car.
1. Remove left-hand cover.
2. Slide off carrier with all its wheels. Later (plastic case) models require you to depress a brass spring underneath to allow this.
3. Change the appropriate wheels on the Carrier. This contains:
*A large brass X wheel (118 to 150 teeth) which has
brass or plastic hub pressed into its centre.
brass or plastic hub pressed into its centre.
*An intermediate brass wheel (55 teeth) - leave this in
place unless very badly worn and loose on its spindle.
place unless very badly worn and loose on its spindle.
*A white or grey nylon bevel gear, on top of:-
*A small brass Z wheel with 2 slots on upper surface.
This comes with 70, 58, 48, 39, 32, 27, 22, 18, or 16
teeth. The smaller ones have no room to stamp the number of teeth on them so you will have to count them!
This comes with 70, 58, 48, 39, 32, 27, 22, 18, or 16
teeth. The smaller ones have no room to stamp the number of teeth on them so you will have to count them!
4. To re-calibrate you only need to change the X and Z wheels. (See illustration below). Slide the old ones off, push out the hub from the large X wheel. With the new wheels in place, the meshing will be incorrect, so turn the carrier over and slightly loosen the two screws A and B. Screw A enables the intermediate wheel to be moved into the mesh with the X wheel, do this adjustment first; the other screw - B, enables the small Z wheel to be adjusted in relation to the intermediate wheel. Adjust so that the wheels spin freely, tighten the screws and check they spin again. Replace the bevel gear, engaging it with the two slots in the Z wheel. On later models a spring is fitted which engages in slots in the X wheel hub and the bevel gear, thus preventing them from falling off when removed. This should only have enough tension to perform this function and be fitted correctly, or it can completely cut through the bevel gear causing loss of drive and class win! Both ends of the spring should be inside of their respective spindles.
When replacing the carrier unit in the Halda, make sure the protruding end of the bevel gear shaft engages in the sliding sleeve on the selector shaft (the +o- control).

General Issues
Tripmaster and Twinmaster
Be careful with the bottom right hand knobs on Twins, the one that selects one or both readouts. The shafts break easily on contact with a navigator's knee or gorilla's fingers and I have very few spares left. The drive cable into Masters can turn either way, just turn the +o- knob to suit. I have sets of new transfers for the lettering so I can do quite a good job on restoring the cases. When re-fitting the calibration gears on the frame, make sure they are in mesh and the big wheel has not been pushed askew on its central hub. PLEASE don't fill them with oil, a dab of grease on the spindles is all they need.
Loose Rattling Bits
The round bushing at the rear of Trips and Twins which accepts the drive cable sometimes comes loose. Easily rectified! Remove the side panel and you will see a flat brass clip with two prongs and a small rectangle bent up. Remove this (on plastic models you will have to remove the carrier locating spring - 2 small screws - first) and use pliers to bend down the prongs a little so that they will engage tightly in the groove in the bushing.
It clicks instead of going around.
A fault mostly found in the plastic case models is that when one register reaches 9 it fails to turn to 0 and just jams up making a clicking noise. Sometimes this is due to the zero knob not having been pulled out fully but mostly it is due to a fault which only I have been able to trace. I know a cure which works, this involves drilling and tapping the back plate. For more details you can email, ring or fax me!
The Bad News
HALDEX AB were taken over by Trancometer in the 80's and have not made any mechanical instruments since the 70's, or any of the electronic Halda Rally computers since 1993. The tooling has been scrapped long ago. The Haldaman Martin Jubb passed away in 2011 and his collection of new parts have not been seen since.I do have a reasonable stock of spares.
The Experts Choice?
So many people ask what the ideal combination of instruments is, Martin Jubb suggested a Twinmaster, a Speedpilot MK.V and a circular average speed calculator as the ultimate for navigational events. For stage events or pacenotes a Twin or Tripmaster is all you will need. You CAN do a Classic Marathon on just a Tripmaster but you need to be practised at working out average speeds.
